Cloudflare zero trust to expose internal kubernetes applications to internet


To expose an internal kubernetes application to the internet we are going to use cloudflare tunnels previously called argo tunnels along with Cloudflare Zero trust Network access policies which are available as a part of their new offering called cloudflare teams. Cloudflare team is available as a free service for 50 users later it will be charged.
Prerequisites:
- A cloudflare account with your domain attached.
- Domain Name servers migrated to cloudflare account.
- Kubernetes cluster with app that needs to be exposed
- A Kubectl client with access to cluster in your operating system
This tutorial covers how to :
- Deploy cloudflared service in the cluster using a replica model
- Routing traffic to an internal kubernetes service using tunnel
- Creating Access control policies to restrict access to the Application
- Configuring WARP client to act as VPN to further restrict Access to Application.
Time to Complete: 20 minutes
What is DNS?
DNS stands for Domain Name System, a system that translates domain names (such as fullness.io) into IP addresses that computers can use to communicate with each other over the internet.
What is Cloudflare?
Cloudflare is a company that offers a range of internet services, including DNS management, content delivery network (CDN) services, and cybersecurity services. One of its key offerings for cybersecurity is Zero Trust Teams. This tool provides secure access to internal applications and resources, while also helping to prevent unauthorised access from external sources.
In addition to Zero Trust Teams, Cloudflare also offers Argo Tunnels, which are secure connections between a web server and Cloudflare's network. Argo Tunnels help to protect against DDoS attacks and other security threats by masking the server's IP address from the public internet.
Installing Cloudflare
Cloudflared is a lightweight tunnelling demon that acts as a proxy between cloudflare network and your origins. Cloudflared receives the client requests and sends them to you via demon without requiring you to make changes to the firewall.
You can download the latest releases of cloudflared for your respective operating systems from the link given below
Login to Cloudflare
Run the following command to login to your cloudflare account
cloudflared tunnel loginCreating a Tunnel
In the example given below simply change the tunnel name in the command from <example-tunnel> to the name of your liking.
cloudflared tunnel create example-tunnel
you will get an output as follows
Tunnel credentials written to /Users/apple/.cloudflared/9768b002-7ef4-49e4-b21c-a778c03830a7.json. cloudflared chose this file based on where your origin certificate was found. Keep this file secret. To revoke these credentials, delete the tunnel.

Created tunnel example-tunnel with id 9768b002-7ef4-49e4-b21c-a778c03830a7
Remember the file path where the credentials are getting stored we need in the later state when we create the kubernetes secret.
Upload the Tunnel Credentials to Kubernetes
Run the below command with the file path where the credentials are stored to create the secret in the kubernetes cluster.
kubectl create secret generic tunnel-credentials --from-file=credentials.json=/Users/apple/.cloudflared/9768b002-7ef4-49e4-b21c-a778c03830a7.jsonReplace the file path in the above command to the one in the above step where the credentials are saved.
Associate a DNS Record to the Tunnel
- Go to the cloudflare dashboard and select the domain to which your tunnel is associated.
- Navigate to the DNS section in the dashboard
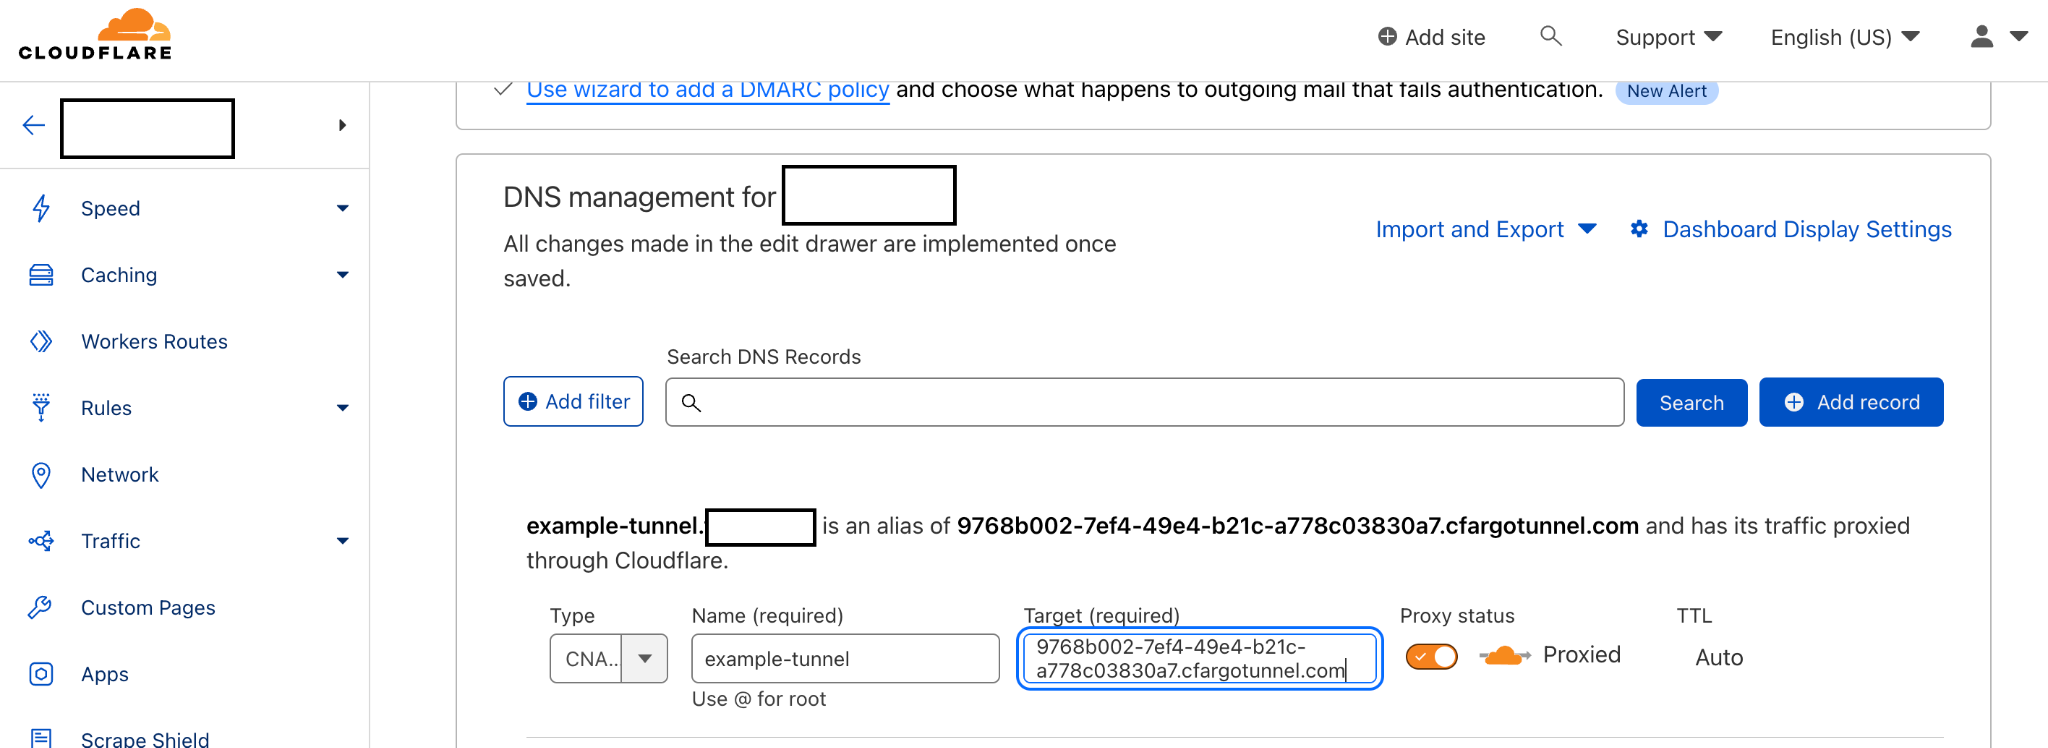
- Now create a CNAME targeting .cfargotunnel.com. In this example, the tunnel ID is 9768b002-7ef4-49e4-b21c-a778c03830a7, so create a CNAME record specifically targeting 9768b002-7ef4-49e4-b21c-a778c03830a7.cfargotunnel.com.
- The below is an example how to create a CNAME record
Deploy cloudflared
In this step we will deploy cloudflared demon using the deployment manifest and a configmap with cloudflare config to serve the traffic to the respective service that we want to expose.
When cloudflared receives traffic from the DNS you configured in the above step, it will send the traffic to the cloudflared pods running in the cluster. Then these pods will proxy the request to the services.
The deployment manifest is as below:
---
apiVersion: apps/v1
kind: Deployment
metadata:
  name: cloudflared
spec:
  selector:
    matchLabels:
      app: cloudflared
  replicas: 2 # You could also consider elastic scaling for this deployment
  template:
    metadata:
      labels:
        app: cloudflared
    spec:
      containers:
      - name: cloudflared
        image: cloudflare/cloudflared:2022.3.0
        args:
        - tunnel
        # Points cloudflared to the config file, which configures what
        # cloudflared will actually do. This file is created by a ConfigMap
        # below.
        - --config
        - /etc/cloudflared/config/config.yaml
        - run
        livenessProbe:
          httpGet:
            # Cloudflared has a /ready endpoint which returns 200 if and only if
            # it has an active connection to the edge.
            path: /ready
            port: 2000
          failureThreshold: 1
          initialDelaySeconds: 10
          periodSeconds: 10
        volumeMounts:
        - name: config
          mountPath: /etc/cloudflared/config
          readOnly: true
        # Each tunnel has an associated "credentials file" which authorizes machines
        # to run the tunnel. cloudflared will read this file from its local filesystem,
        # and it'll be stored in a k8s secret.
        - name: creds
          mountPath: /etc/cloudflared/creds
          readOnly: true
      volumes:
      - name: creds
        secret:
          # By default, the credentials file will be created under ~/.cloudflared/<tunnel ID>.json
          # when you run `cloudflared tunnel create`. You can move it into a secret by using:
          # ```sh
          # kubectl create secret generic tunnel-credentials \
          # --from-file=credentials.json=/Users/yourusername/.cloudflared/<tunnel ID>.json
          # ```
          secretName: tunnel-credentials
      # Create a config.yaml file from the ConfigMap below.
      - name: config
        configMap:
          name: cloudflared
          items:
          - key: config.yaml
            path: config.yaml
---
# This ConfigMap is just a way to define the cloudflared config.yaml file in k8s.
# It's useful to define it in k8s, rather than as a stand-alone .yaml file, because
# this lets you use various k8s templating solutions (e.g. Helm charts) to
# parameterize your config, instead of just using string literals.
apiVersion: v1
kind: ConfigMap
metadata:
  name: cloudflared
data:
  config.yaml: |
    # Name of the tunnel you want to run
    tunnel: example-tunnel
    credentials-file: /etc/cloudflared/creds/credentials.json
    # Serves the metrics server under /metrics and the readiness server under /ready
    metrics: 0.0.0.0:2000
    # Autoupdates applied in a k8s pod will be lost when the pod is removed or restarted, so
    # autoupdate doesn't make sense in Kubernetes. However, outside of Kubernetes, we strongly
    # recommend using autoupdate.
    no-autoupdate: true
    # The `ingress` block tells cloudflared which local service to route incoming
    # requests to. For more about ingress rules, see
    # https://developers.cloudflare.com/cloudflare-one/connections/connect-apps/configuration/ingress
    #
    # Remember, these rules route traffic from cloudflared to a local service. To route traffic
    # from the internet to cloudflared, run `cloudflared tunnel route dns <tunnel> <hostname>`.
    # E.g. `cloudflared tunnel route dns example-tunnel tunnel.example.com`.
    ingress:
    # The first rule proxies traffic to the httpbin sample Service defined in app.yaml
    - hostname: tunnel.example.com
      service: http://web-service:80
    # This rule sends traffic to the built-in hello-world HTTP server. This can help debug connectivity
    # issues. If hello.example.com resolves and tunnel.example.com does not, then the problem is
    # in the connection from cloudflared to your local service, not from the internet to cloudflared.
    - hostname: hello.example.com
      service: hello_world
    # This rule matches any traffic which didn't match a previous rule, and responds with HTTP 404.
    - service: http_status:404
You can configure the ingress hostname and service to your hostname and service address in your cluster. By default this manifest and configmap gets deployed into default namespace if you wish to deploy it in another namespace specify it while deploying.
Below is the command to deploy the manifest
kubectl apply -f cloudflared.yaml -n defaultyou can examine the status of your deployment by listing the pods and checking the logs. Below is the example:
kubectl get pods

NAME                                  READY   STATUS    RESTARTS   AGE
cloudflared-57746f77fd-frc99          1/1     Running   0          12m
cloudflared-57746f77fd-xht8n          1/1     Running   0          12m
httpbin-deployment-67f749774f-42tqj   1/1     Running   0          20h

kubectl logs $(kubectl get pod -l app=cloudflared -o jsonpath="{.items[0].metadata.name}")

2021-05-04T17:39:49Z INF Starting tunnel tunnelID=ef824aef-7557-4b41-a398-4684585177ad
2021-05-04T17:39:49Z INF Version
2021-05-04T17:39:49Z INF GOOS: linux, GOVersion: go1.15.7, GoArch: amd64
2021-05-04T17:39:49Z INF Settings: map[config:/etc/cloudflared/config/config.yaml cred-file:/etc/cloudflared/creds/credentials.json credentials-file:/etc/cloudflared/creds/credentials.json metrics:0.0.0.0:2000 no-autoupdate:true]
2021-05-04T17:39:49Z INF Generated Connector ID: 4c5dc5d3-8e10-480e-ac74-e385e591553e
2021-05-04T17:39:49Z INF Initial protocol h2mux
2021-05-04T17:39:49Z INF Starting metrics server on [::]:2000/metrics
2021-05-04T17:39:49Z INF Connection 1daced2f-466c-4610-8ba6-7642a8ddec68 registered connIndex=0 location=MCI
2021-05-04T17:39:50Z INF Connection 1a5276bc-3313-4bb7-a677-d93deccab24f registered connIndex=1 location=DFW
2021-05-04T17:39:51Z INF Connection aa7adacc-e855-4b11-bf41-e113419b7ef4 registered connIndex=2 location=MCI
2021-05-04T17:39:51Z INF Connection a8055c76-2a90-4be5-8dc9-ebaa5c58fb5f registered connIndex=3 location=DFW
Visiting the DNS Hostname
You can now visit the hostname you configured for this tunnelled connection to access your internal kubernetes application, you can even scale the cloudflared deployment according to the load and do rolling upgrades in the future.